Tuesday, September 06, 2011

Wiring 1-wire....

1-wire is really simple to connect up.

All you need is 3 wires - +v, Gnd, and Data. unshielded cat5 cable along with RJ45 or RJ11 connectors.
1-wire devices are "plugged" into the 1-wire bus.

To build my 1-wire system, I obtained some cat5 wall modules, and a couple of modular faceplates.

The cat 5 cable is just punched into the back of each module in turn so all the pin 1s are connected together etc.

my sensors are connected up as follows

Sensor to Cat 5 (tia568b)
pin 1 +v to Pin 2 Orange
pin 2 gnd to Pin 4 Blue
pin 3 data to Pin 3 White/Green

A couple of the sensors are soldered to the end of cat5 fly leads, but most have been fitted into RJ45 plugs, some are shown below along with a naked DS1820 1-wire temperature sensor


Saturday, September 03, 2011

Setting HomeAutomation up to use 1-wire

As I said in an earlier post HomeAutomation is a really nice web server app based on PHP with a MySQL backend supporting Telldus Tellstick devices for controlling remote sockets.

It also usefully supports monitoring temperatures from 1-wire devices using various protocols. The one I am using is owfs (one wire
file system). You can see the temperatures displayed on the house floorplan in the screenshot below.


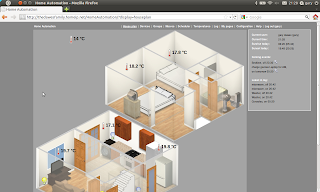
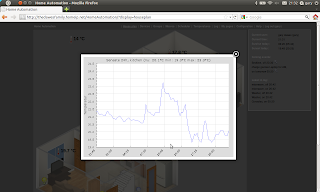
Additionally, if you click on one of the temperature labels, you get a really nice popup graph of the recent data for that sensor.

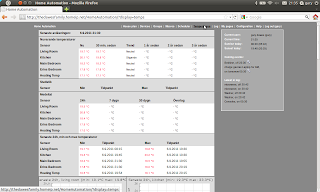
And there is a full page with data such as high and low for each sensor, and 24 hour, 7 day, and 30 day graphs for each sensor.


To get all this working is fairly easy and should not take too long

Firstly download weather parser.zip from http://karpero.mine.nu/ha/downloads and unzip to /var/www/HomeAutomation

install php gd graphing library
apt-get install php5-gd
You then need to install some additional fonts
ensure the following line is in /etc/apt/sources.list
deb http://ftp.us.debian.org/debian/ testing main contrib non-free
then
apt-get update
apt-get install msttcorefonts
next, edit /var/www/HomeAutomation/parser/parser-config.php and uncomment the 1-wire system used.

add the following command to the crontab which will query the sensors every 15 minutes.
*/15 * * * * php /var/www/HomeAutomation/parser/parser.php
edit the appropriate php file in /var/www/HomeAutomation/parser/system_config as I am using owfs, I need to edit owfs.php, and add lines for each sensor.
$sensorsToParse["Kitchen"] = "/lwire/10.E1CA5B020800/temperature";
The directory name will vary from sensor to sensor as it is the sensor's address.

Once all the sensors are in, at a command line type the following to read the data from the sensors.
php /var/www/HomeAutomation/parser/parser.php
Open the HomeAutomation site in a browser

In Configuration, settings enable the "use 1-wire temperature" and save.
Refresh the page, and you should see some additional options.

In Configuration, open "Temperature sensor" and click "update sensors" this will pull in the list of sensors from the database which was populated by running the parser.php command earlier.

In Configuration, select House Plan. This will allow you to select each device and sensor from a menu and place them on the house plan.

And that should be job done...

Thursday, September 01, 2011

one wire network

The HomeAutomation web application I am using has the capability to monitor room temperatures via a 1-wire network.

1-wire is a microlan which only uses 3 wires (5v, gnd, & data), and usefully can run over cat5 cabling, making it very easy to bolt onto an existing network. There are various sensors available, mostly in a TO92 transistor style package. Currently I have mostly temperature sensors (DS8120 variants).

If you only need a few sensors, then it's worth checking out the Maxim site as they offer samples for most of their sensors.

You also need an interface from the computer to the 1-wire network. This used to be via RS232, and there are simple circuits on the web, but as most computers now don't have RS232, USB is the next easiest and cheapest.

I chose the ibutton LinkUSBi available in the Uk from Homechip which has a RJ45 for plugging to a Cat5 network.

Here is the linkusbi complete with a 1-wire temp sensor connected to Cat5 via a connector block for testing.


To get the 1-wire network up and running, we need to install OWFS on the server. OWFS is a 1-wire file system which presents the information from the 1-wire network as a filesystem, which makes it extremely easy to poll the information at regular intervals

Compiling and installing owfs on a Pogoplug running Debian

First install the required modules

apt-get install automake autoconf autotools-dev gcc g++ libtool fuse-utils libfuse-dev swig python2.5-dev tcl8.4-dev php5-dev

add the following lines to /etc/modprobe.f/blacklist
blacklist ds9490r
blacklist ds2490
blacklist wire
download, extract, and the compile current versions of libusb and owfs from sourceforge
cd /usr/src/libusb
./configure --without-x
make
make install
cd owfs
./configure --enable-debian
make
make install
You then need to create /etc/udev/rules.d/56-owfs.rules and add the following lines to it.
SUBSYSTEM!="usb_device", ACTION!="add", GOTO="owfs_rules_end"
# DS2490 1-Wire adapter
SYSFS{idVendor}=="04fa", SYSFS{idProduct}=="2490", MODE="0666", GROUP="owfs"

LABEL="owfs_rules_end"
You then need to add a group, a user, and create a mountpoint for OWFS
add group owfs usermod -a -G owfs owfsuser mkdir /lwire
Connect devices by plugging in the 1-wire devices to the linkusbi and then plugging that into a spare USB port on the computer, then load the filesystem driver and start owfs
modprobe fuse
start owfs
/opt/owfs/bin/owfs -d /dev/ttyUSB0 /lwire --allow_other
You should then be able to walk the 1-wire filesystem, and list the directories.
Each device will be displayed as a separate directory named after the address as below:
ls /lwire
01.4AA873140000 alarm settings statistics system
22.D6331A000000 bus.0 simultaneous structure uncached
If you cd to one of the device directories, then more information is displayed:
/lwire/22.D6331A000000# ls
address errata id r_address temperature temperature12 templow
alias family locator r_id temperature10 temperature9 type
crc8 fasttemp power r_locator temperature11 temphigh
Next job is to get this information into a nice usable form...

Friday, August 26, 2011

Home Automation on a Debian powered PogoPlug

A while ago, I bought some remote controlled sockets branded Status from my local Asda for the princely sum of £5 for 3.


I soon realised the limitations of the remote, and started casting about for alternatives.

I eventually stumbled across the Tellstick from Telldus, which is a usb connected transmitter which can send the on/off commands to many brands of remote controlled devices. These looked like a perfect fit for my Pogoplug.

The base software is slightly lacking, but there are several third-party apps for Windows, Linux, Mac, and Android. The one which appealed to me the most was HomeAutomation. This is a web-based system (so controllable from anywhere) and one of it's main features is that icons for the controlled devices can be placed on a house plan image as shown below


As the pogoplug is a ARM based device, the Telldus software is not packaged and needs to be built from source.

The steps to do this are below.

There are some prerequisites which need to be installed first, assuming the Pogoplug is already a LAMP (Linux, Apache, MySQL, PHP) server:

  • apt-get install build-essential libftdi libftdi-dev cmake libconfuse0 libconfuse-dev
  • cd /usr/src
  • wget http://download.telldus.se/TellStick/Software/telldus-core/beta/telldus-core-2.0.104.tar.gz
  • tar -zxvf telldus-core-2.0.104.tar.gz
  • cd ./telldus-core-2.0.104
  • cmake -DCMAKE_INSTALL_PREFIX=/usr
  • make
  • make install
Once the Telldus software is installed, configured and tested with your devices - this will vary depending on what you have, and is easy with Telldus Center on your PC, the next step is to install the HomeAutomation software.

  • download from http://karpero.mine.nu/ha/index.php?page=download&hl=en_US to /usr/src
  • unzip /home/gary/Downloads/HomeAutomation_v2_0_2.zip
  • mv /var/www/HomeAutomation_v2_0_2 /var/www/HomeAutomation
  • cd /var/www/HomeAutomation
  • mv config_sample_linux.php config.php
  • nano config.php
  • chown www-data:www-data /var/www/HomeAutomation/ -R
  • Ensure that the timezone is configured in your php.ini file
The next thing to do is to create a database and user for HomeAutomation in MySQL. This can either done at the command prompt as below or using a tool such as PHPmyAdmin.
  • mysql -u root -p password
  • create database homeautomation;
  • create user username@localhost identified by password "password";
  • grant all privileges on database homeautomation to username@localhost identified by password "password";
  • exit;
Next, browse to the HomeAutomation folder on your webserver, and follow the installation wizard.

If you want to create a nice 3-D floorplan of your house, then browse to Autodesk Homestyler where you can create one for free.